kuniga.me > NP-Incompleteness > Newsletter
Newsletter
26 Sep 2026

I’ve been using RSS on and off with Feedly but I often forget to check it. I have had more success with newsletters, where I receive posts directly in my email. A recent example is Philip Su’s Molochinations which uses Substack, which offers newsletters out of the box.
I don’t use Substack and didn’t want to pay for a service to add this feature, so decided to explore creating one from scratch, using AWS infra. In this meta post, I’ll describe a serverless architecture that implements this.
Overview
The core functionality is simple: a system that detects when a new post has arrived on my repository and then sends an email to subscribers stored in a database.
We also have flows for users to subscribe and unsubscribe. Some care needs to be taken to make sure users cannot take actions on behalf of email addresses they don’t own.
Architecture
Context
I use GitHub Pages to host my static website, which in turn uses Jekyll to generate HTML pages from Markdown files.
Components
The major components of the system are: the browser (client), GitHub’s workflow, AWS lambda functions and the API gateway.
We can think of GitHub’s workflow as a cron job that periodically runs some code. AWS lambda is like a stateless server that takes requests, performs some actions and returns a response. The advantage of using them is that we don’t have to manage the server ourselves.
The API gateway serves as a router: it redirects requests to specific URLs, e.g. newsletter.kuniga.me/subscribe to specific lambda functions.
Sending Emails
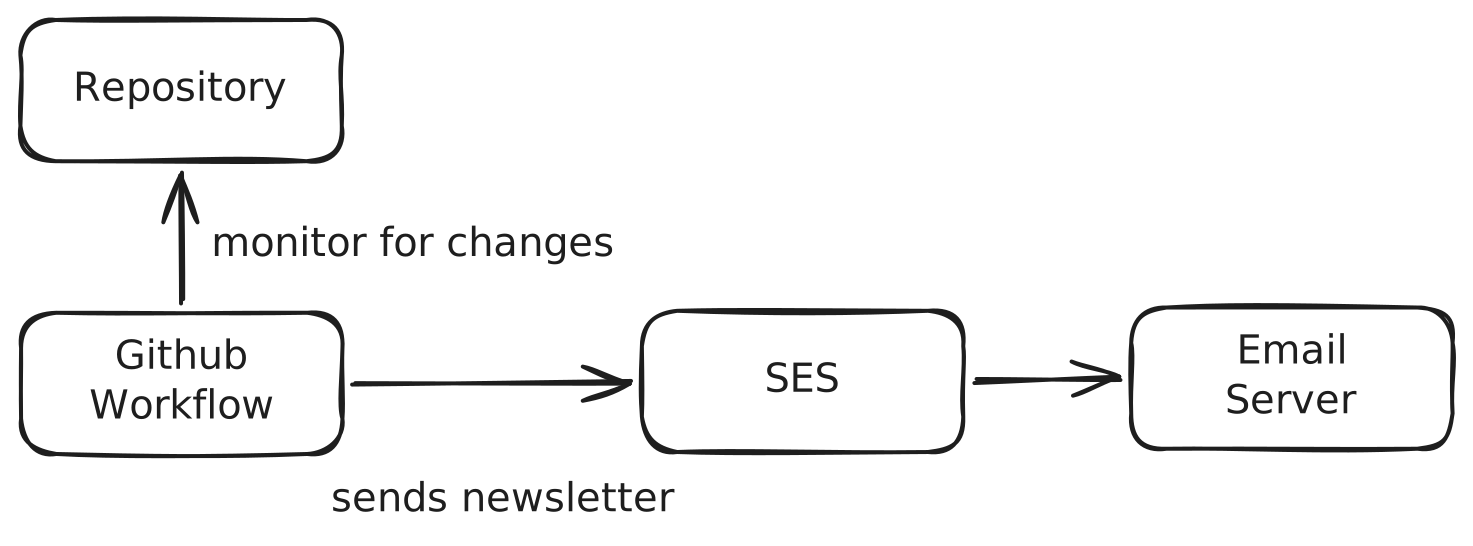
We assume there’s a list of emails stored in a key-value store, DynamoDB in our case. To avoid sending duplicate emails to the same destination in case of partial failures, we also store the last post URL sent to a given email.
The code to send emails, newsletter/sender/send.py, is relatively straightforward: read the list of recipients from the DB, and for each we use Amazon’s SES (Simple Email Service) to send the email:
def send_email(email, post):
   content = make_content(email, post)
   ses.send_email(
      FromEmailAddress="newsletter@kuniga.me",
      Destination={
         "ToAddresses": [email],
      },
      Content=content
   )

subscribers = get_subscribers()
for subscriber in subscribers:
   email = subscriber["email"]

   if subscriber.get("last_sent_post") != post["id"]:
      send_email(email, post)

      # updates the kv-store with the last post seen
      mark_sent(email, post["id"])
This code is executed by GitHub’s workflow.
Subscription
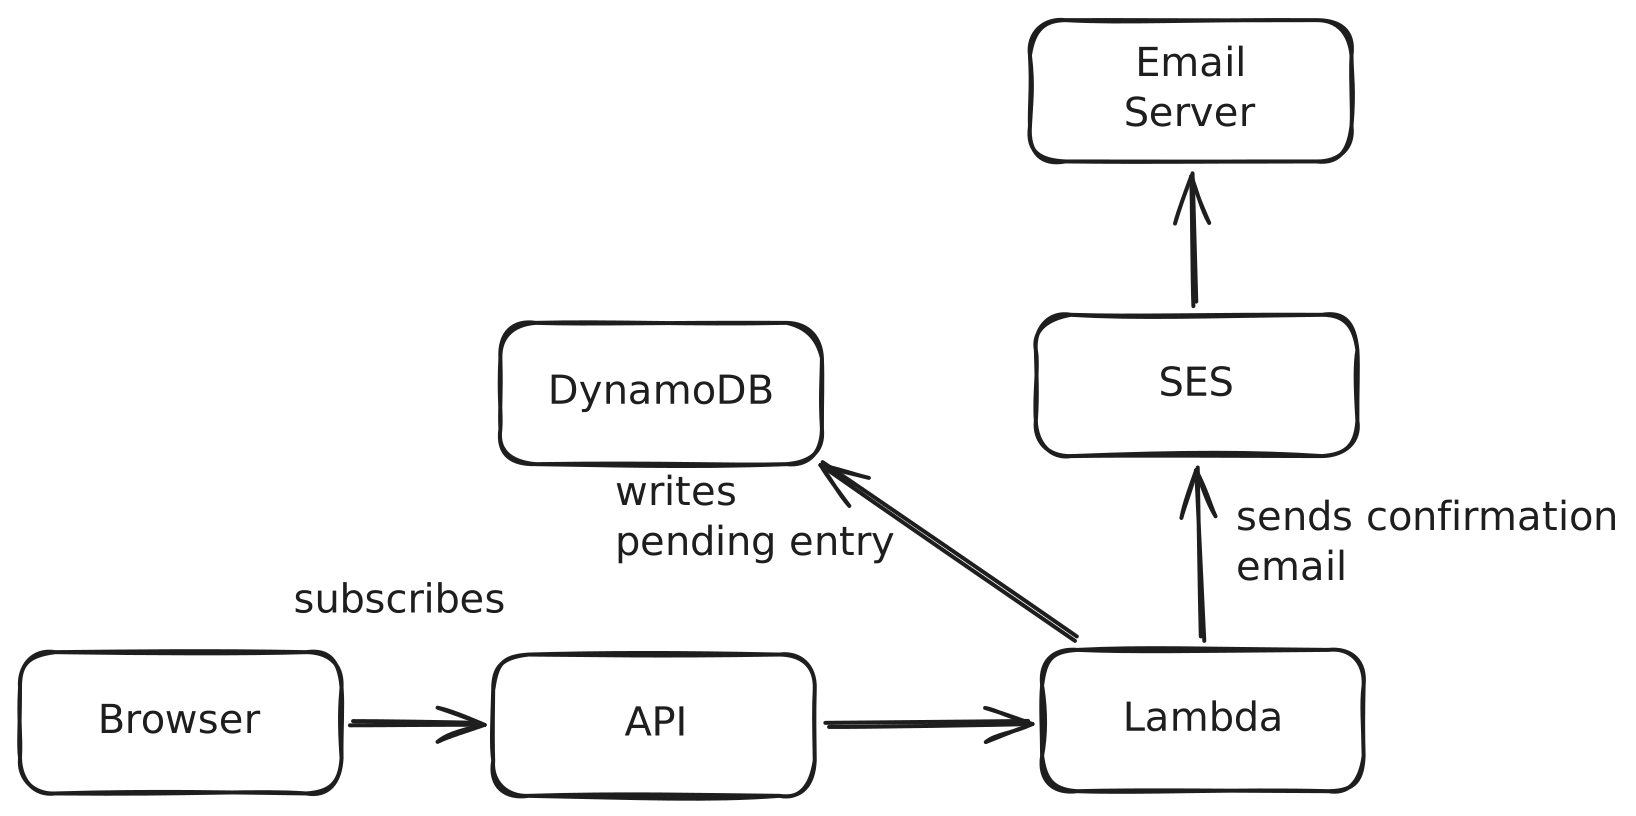
The subscription is a 2-step process: when you subscribe your email, it sends you an email with a link for confirmation. This prevents other people from subscribing your email. Let’s cover this flow in more detail.
The blog now has a form where users can put their email and click a button. This sends a POST request to https://newsletter.kuniga.me/subscribe with an email as a parameter.
Then the API gateway redirects this request to the lambda function. The function basically:
- Generates a random token
- Inserts an entry on the DB marking this email as pending and that token
- Sends a confirmation email to the recipient with a confirmation link with that token.
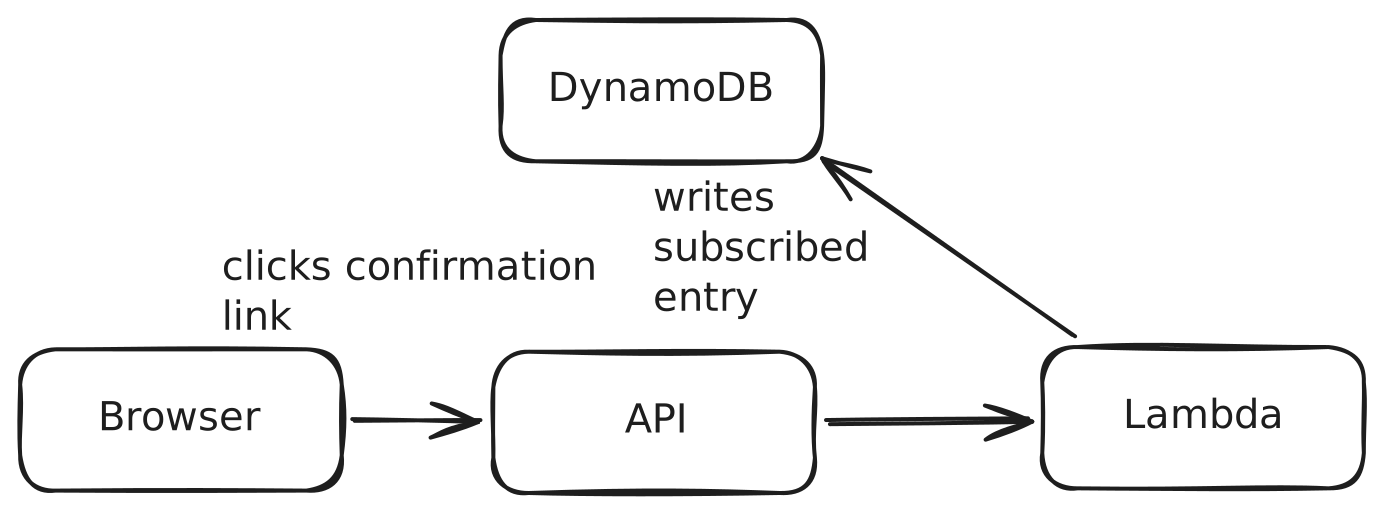
Clicking the link sends a GET request to https://newsletter.kuniga.me/subscribe which then validates that the token matches what’s stored in the DB.
There’s potential for a DDoS attack here because even though we require a confirmation email to actually start receiving the newsletter, subscribing an email via the UI adds an entry to the DB. To prevent abuse, we set a QPS limit on this flow.
Unsubscription
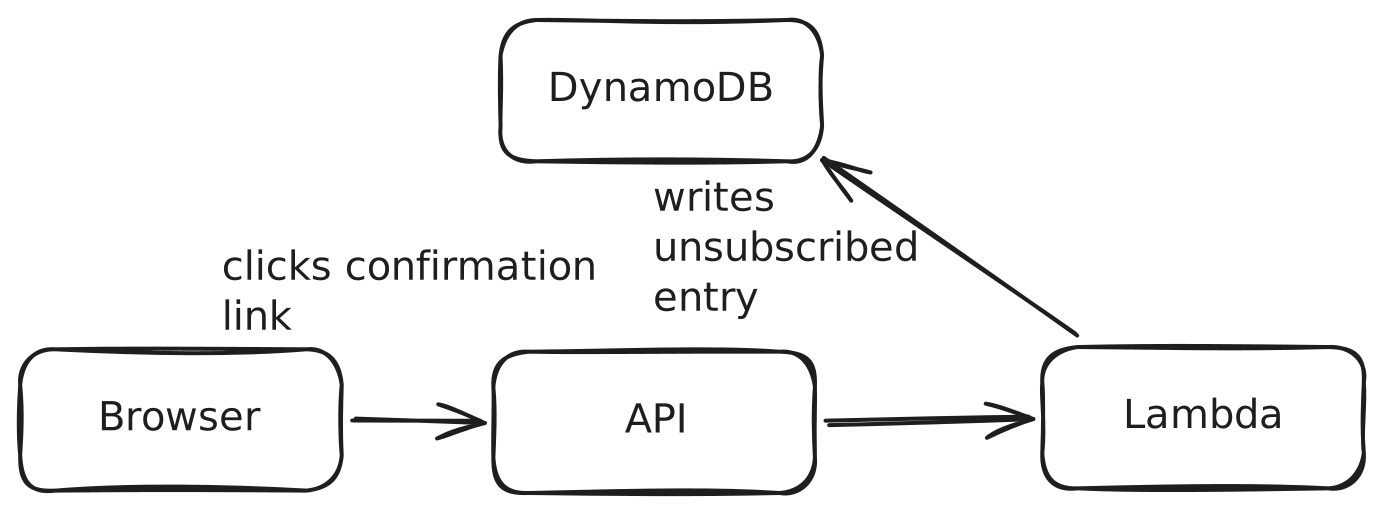
For each newsletter we send to a recipient, we generate an unsubscribe link containing a Ed25519 signature that is essentially the recipient address encoded with a private key, e.g. https://newsletter.kuniga.me/unsubscribe?email=alice@example.com&sig=<signature>.
This endpoint is also routed to a lambda function which will decode the signature using a public key and verify the payload matches the email.
This flow prevents a bad actor from unsubscribing an email they don’t own, but if the newsletter recipient shares the URL or the post containing the link to unsubscribe, then someone else can use that URL to unsubscribe.
Authentication
Setting up the authentication system was the most time-consuming and complex part of the system. ChatGPT breezed through it, but I had to spend quite some time afterwards to figure out what was happening.
A mental model that worked for me is: we create roles to which we grant permission to perform specific actions (e.g. send email, write to DB). Then we allow different actors to impersonate that role.
The actors in our system that require authentication are GitHub’s workflow (sends the email) and the lambdas. The browser does not need authentication.
Roles
For each role we need to create a policy, which is a JSON file that describes which actions it can perform. In the example below, the actions are reading and writing to DynamoDB and sending emails:
// newsletter/iam/iam/github-actions-policy.json
{
   "Version": "2012-10-17",
   "Statement": [
      {
         "Effect": "Allow",
         "Action": [
         "dynamodb:Scan",
         "dynamodb:UpdateItem"
         ],
         "Resource": "...:table/newsletter-subscribers"
      },
      {
         "Effect": "Allow",
         "Action": "ses:SendEmail",
         "Resource": "*",
         "Condition": {
            "StringEquals": {
               "ses:FromAddress": "newsletter@kuniga.me"
            }
         }
      }
   ]
}
We can then attach this policy to the role newsletter-github-actions via:
aws iam put-role-policy \
  --role-name newsletter-github-actions \
  --policy-name NewsletterSender \
  --policy-document file://newsletter/iam/iam/github-actions-policy.json \
  --profile personal
Analogous policies exist for the other roles, such as newsletter-subscribe-lambda, newsletter-confirm-lambda and newsletter-unsubscribe-lambda.
GitHub Workflow
The GitHub workflow must authenticate itself so that it can assume the role newsletter-github-actions. We want to make sure only the workflow for the repository kunigami/kunigami.github.io can assume this role.
The idea is that GitHub generates a token containing information such as its repository and branch. Then it signs this token with its private key. Then SES uses a trusted GitHub endpoint (https://token.actions.githubusercontent.com) to securely extract the token metadata.
To set this up we first register GitHub’s trusted endpoint with my account (the aws CLI is already connected to my account):
aws iam create-open-id-connect-provider \
  --url https://token.actions.githubusercontent.com \
  --client-id-list sts.amazonaws.com \
  --profile personal
This returns the identifier arn:aws:iam::377238675852:oidc-provider/token.actions.githubusercontent.com which we’ll use next. We set up a policy that configures how GitHub’s workflow can assume the role newsletter-github-actions. We have:
// newsletter/iam/github-actions-trust.json
{
  "Version": "2012-10-17",
  "Statement": [
    {
      "Effect": "Allow",
      "Principal": {
        "Federated": "arn:aws:iam::377238675852:oidc-provider/token.actions.githubusercontent.com"
      },
      "Action": "sts:AssumeRoleWithWebIdentity",
      "Condition": {
        "StringEquals": {
          "token.actions.githubusercontent.com:aud": "sts.amazonaws.com"
        },
        "StringLike": {
          "token.actions.githubusercontent.com:sub": "repo:kunigami/kunigami.github.io:*"
        }
      }
    }
  ]
}
The gist here is that a GitHub workflow can assume the role newsletter-github-actions if it’s for the repository kunigami/kunigami.github.io and we’ll use https://token.actions.githubusercontent.com as verifier.
We can attach this policy to the role via:
aws iam create-role \
  --role-name newsletter-github-actions \
  --assume-role-policy-document file://newsletter/iam/github-actions-trust.json
Note the flag --assume-role-policy-document, which indicates a different policy is being used than --policy-document from an earlier command.
Once GitHub authenticates itself with SES, GitHub receives temporary credentials which will allow it to call SES.
Lambdas
Authenticating the lambda functions is easier because they’re part of AWS offerings. We just need to specify such:
{
  "Effect": "Allow",
  "Principal": {
    "Service": "lambda.amazonaws.com"
  },
  "Action": "sts:AssumeRole"
}
Conclusion
We live in interesting times! ChatGPT was able to guide me through the entire process and all I did was to keep running commands. If I had done this through Codex it might have been a completely hands-off process. This is the type of project I’d never do because of the low ROI.
I did provide some input on the security setup (using private-public keys for authentication) and on the user experience of the subscription process though.
I got lost when I was following the instructions from ChatGPT, especially around setting up the roles and policies, so I wanted to write a post to make sure I understand it. I’m glad I did.
I liked this serverless architecture. I had heard of FaaS (function as a service) but never used one and I’m hoping it will lead to a lower maintenance overhead. This is also the first non-trivial project I did using AWS, so I’m excited to try it for more complex projects should the need arise.
Related Posts
In On Doing Things Manually I mentioned that I like doing things manually to learn. In this case, I didn’t write most of the code, but I did want to write a post to understand the parts and build a mental model.
In Coding with AI we mentioned how AI makes building small projects much more practical. I also quoted from Philip Su’s Molochinations there!
The exactly-once problem is very tricky to solve, as I learned when working with stream processing! The book Streaming Systems touches on this, and also Stream Processing with Apache Flink