kuniga.me > NP-Incompleteness > Jupyter Architecture
Jupyter Architecture
12 Feb 2022
In this post we’ll study the architecture of Jupyter notebooks. I’ve been using them often for my Python-based posts and am also working on a related space at work, so I was interested in learning more how it works behind the scenes.
IPython, Jupyter Notebooks and JupyterLab
The first point of clarification is to determine what does Jupyter notebooks refers to. As you Google you might come across with several related terms which can be a bit confusing. Jupyter notebooks is the application that runs when we type:
jupyter notebookIn the terminal, and it launches a web page in a new browser tab, where we can edit and create notebooks. This is what this post we’ll focus on, despite the fact it has been in maintenance mode [3]:
Please note that this repository is currently maintained by a skeleton crew of maintainers from the Jupyter community. We encourage users to transition to JupyterLab
History
Jupyter Notebooks evolved from a project called IPython.
IPython itself started off as a REPL (read–eval–print loop) tool for Python back in 2007 [1]. Note that is not the same as the default REPL we get when running python today. In 2011 it got a dedicated frontend via the Qt framework (v0.11) and later that year also a web-based frontend (v0.12), which was called IPython notebook.
Over time interest in supporting other languages grew, so in 2014 the project Jupyter was created and in 2015 it became its own thing. Jupyter is a portmanteau of Julia, Python and R, three of the most popular languages used for analytics.
Jupyter notebooks are the IPython notebooks re-branded. But instead of being restricted to a Python backend, it is generalized and can also interact with other backends (called kernels) such as Julia and R.
IPython then essentially became the Python kernel for Jupyter, but there is also a lot of language-agnostic functionality from IPython that carried over to Jupyter’s core, such as the notebook format (nbformat) which can be seen from the fact that notebook extensions are still .ipynb.
JupyterLab is the next generation of Jupyter notebooks and it feels more like an IDE, with tabs and a file directory, but at the center is still the notebook concept with its interactive cells.
Architecture
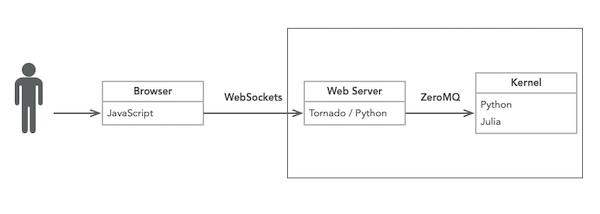
Figure 1 depicts the high-level building blocks for a single-user Jupyter notebook. The browser communicates with an HTTP server using WebSockets. The server uses Tornado [4], a popular HTTP server implemented in Python.
On its turn the server relays the message to the kernel process and the inter-process communication is done via ZeroMQ, an abstraction that simplify implementing common communication patterns such as client/server and pub/sub. The server and kernels are co-located (i.e. run in the same host).
When we run jupyter notebook the server and kernel run in the local machine, but they could also be run on a remote host.
Multi-user
From [5], it’s possible to connect multiple clients to a single kernel. I couldn’t determine whether the clients connect to the same Jupyter (tornado) server or if multiple servers are spawned.
Data Model
The notebook’s contents are stored in a text file in JSON format with extension .ipynb. It also stores the result of the computation inline in this file, meaning this file can get quite big. I actually have a pre commit git hook to clear the outputs from the notebook files in my repository.
I find it weird to store the result of computation with the program itself, but I can see the appeal in caching the results this way so that when you share your notebook files with other people it will have the results ready for consumption even if they can’t run the code themselves.
Hosting
By default Jupyter runs on localhost but it can be easily setup to run in a remove server, by providing the ip + port:
jupyter notebook --ip <ip> --port <port>When we run this it displays the URL with an authentication token:
http://<ip>:<port>/?token=<token>Binder is a tool that provides a serverless option for Jupyter notebooks, where they automatically reserve and setup a machine behind the scenes for you, which seems to be closer to the Google Colab model.
Let’s now do a deep dive on the communication aspect.
Communication
Web server and Kernel
As we mentioned above the webserver communicates with the kernel process using ZeroMQ.
There are a few connections types used also called channels or sockets.
shell: used to receive input from all clientsio_pub: used to broadcast messages to all clientsstdin: used by clients to send data from the output, for example when the execution of the code prompts users to input information (e.g. Python’sinput())control: same asshellbut separate due to higher priority, for example to display shutdown and debug messages (useful if shell process is stuck)heartbeat: used by clients to periodically send pings/heartbeats to determine if the server is still alive/connected.
Client and Web server
As we mentioned above the client (browser) communicates with the webserver using WebSockets but it also regular Ajax requests for some special messages as we’ll see later.
The WebSocket is sticky: all messages are exchanged from a single connection which lasts until the kernel is restarted or the page is reloaded.
Flows
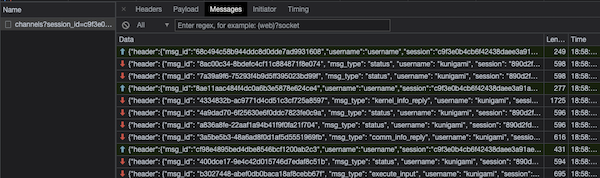
Let’s now consider a few scenarios and inspect which messages are being exchanged. To see the requests being sent to the server we can use Chrome’s network tab and check for the WS (WebSocket) tab. There will be an entry for the web socket connection and the messages sent over this connection.
Execute Code
In this scenario, the user runs a piece of code. Let’s assume they’re connected to the Python kernel and the code is:
import time

i = 0
while i < 5:
    print(i)
    i += 1
    time.sleep(5)
The sequence of messages sent are as follows (message type / channel name):
(1) → execute_request / shell(2) ← status / iopub(status=busy)(3) ← execute_input / iopub(4) ← stream / iopub(multiple of them)(5) ← status / iopub(status=idle)(6) ← execute_reply / shell
The code is sent as payload in (1). The server then replies to indicate it’s busy processing the request in (2). It also broadcasts the code to all clients (including the requester) in (3) and as stdout/stderr is generated it streams that multiple times in (4).
When the computation is done tne server marks itself as idle (5) and then indicates the end of execution via (6).
This sequence maps really closely to those between the web server and the kernel as described in [5].
Request Information from Client
In this scenario, the user runs a piece of code that blocks requesting some user information:
r = input('enter a number:')
print(r)
The sequence of messages sent are as follows (message type / channel name):
(1) → execute_request / shell(2) ← status / iopub(status=busy)(3) ← execute_input / iopub(4) ← input_request / stdin
The same sequence of messages occur as in the Execute Code flow, but now the kernel will send a message input_request (4) to the client and block waiting for a input_reply.
Once the user types a value the messages follow as before.
(5) → input_reply / stdin(6) ← stream / iopub(7) ← status / iopub(status=idle)(8) ← execute_reply / shell
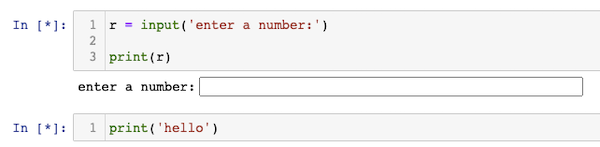
It’s worth noting that multiple cells share the same single threaded kernel process. In the example above, if the kernel is blocked waiting for input_reply, it will not process the code from other cells.
This can be tested by adding a second cell with:
print('hello')Then execute the first cell but, before providing the input, execute the second cell. It will not display "hello" until a value is provided in the first cell, as show in Figure 3.
Displaying Data
In this scenario, the user runs a piece of code that returns rich data, an interactive plot:
import plotly.express as px
fig = px.scatter(x=[0, 1, 2, 3, 4], y=[0, 1, 4, 9, 16])
fig.show()
(1) → execute_request / shell(2) ← status / iopub(status=busy)(3) ← execute_input / iopub(4) ← display_data / iopub(5) ← status / iopub(status=idle)(6) ← execute_reply / shell
This is very similar to the basic execution flow, except that the output is sent via a display_data message (4). The content of this message is a JSON object keyed by the mime type, which for plotly is application/vnd.plotly.v1+json.
Different payloads will have different mime types and this informs the client how to display the payload. For application/vnd.plotly.v1+json it returns a JSON blob containing the chart information but all the rendering is done in the browser.
If we instead render a chart using Matplotlib which returns an image, the payload is keyed by the mime type image/png.
Interrupting Execution
In this scenario, the user runs a piece of code that gets stuck and they kill it, either by typing Cmd+C or clicking the stop button.
while True:
  pass
The sequence of messages sent are as follows (message type / channel name):
(1) → execute_request / shell(2) ← status / iopub(status=busy)(3) ← execute_input / iopub
Pressing Cmd+C:
(4) → kernel_info_request / shell(5) ← error / iopub(ename=KeyboardInterrupt)(6) ← execute_reply / shell(7) ← status / iopub(status=idle)(8) ← kernel_info_reply / shell
This is an interesting set of messages. The message sent from the client (4) has no information about the interruption. Upon checking the other network requests I found an Ajax request to this REST endpoint: api/kernels/<kernel ID>/interrupt, meaning that the interruption request doesn’t go through the web socket.
This makes sense as the web socket between the browser and the web server could be stuck and having a separate endpoint for this would allow the interruption request to go through.
From the web server to the kernel, a message of type interrupt_request is sent over the control channel, which has an analogous purpose to the dedicated REST endpoint (i.e. avoid a stuck main channel).
Conclusion
In this post we learned more about the differences between IPython, Jupyter Notebooks and JupyterLab. We also learned about how IPython evolved into Jupyter Notebooks and became its Python kernel.
We then took a look at the architecture of this system, especially around message passing and did some hands-on analysis of common scenarios. Overall it’s a relatively straightforward architecture with a clever use of multiple channels for handling different use cases.
Related Posts
Sockets is a loosely related post. It describes sockets at a lower level, while both WebSockets and ZeroMQ are higher level abstractions on similar concepts.
